Showing posts with label In the Garden. Show all posts

Friday, May 4, 2012

Dandelion Pre-School


Yesterday, I followed a Facebook link put up by a friend to a post describing The Wonderment Curriculum by Raising Arrows.  I clicked on the link out of curiosity, but was highly skeptical that I would find much merit in a pre-school curriculum.  Her post moved me to tears.  Joyful tears. 

This is it!  This is what we do!  And she described it so well.

To illustrate how this plays out in real life, I'll show you what a part of our day last week looked like.

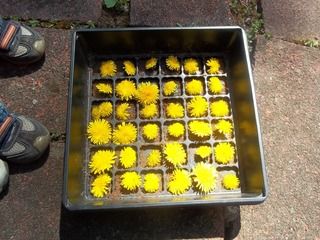
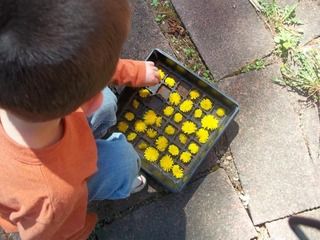
It was sunny and mild, and we try to spend the better part of every such day outdoors.  I hung up the laundry while the Littles became fascinated by the dandelions growing in the yard and kept bringing "flowers for mama".  Who can resist flowers so sweetly given?  I set my gifts in a tray used to sprout seeds so they wouldn't blow away.

And then came the idea... why not fill each section of the tray?  (I realized the added benefit that picking the dandelions before they went to seed would mean less to spread through the yard, so I encouraged as much dandelion picking as they were interested in doing.)  So Big Littles went about filling the tray with Little Littles adding to it occasionally.  Big Littles and I did some comparing/contrasting of the sizes of the blooms, counted them, noted patterns in the tray, later we talked about why they wilt after they are picked... who knew there was so much learning that could happen by casually picking dandelions?  Big Littles became so engrossed that he filled a second tray!


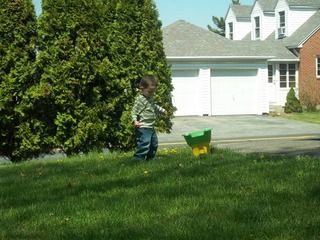
 Meanwhile, on his own, Little Littles got out his wheelbarrow and got to work.  He trotted around the yard and picked at least a HUNDRED dandelions!  He was such a focused little worker and he was so proud of his accomplishment! 


These are precious moments of wonder, and this is the way we do pre-school.

Pin It

Tuesday, November 8, 2011

Winterizing

snowed in brussel sprouts

Winter caught us a little off guard this year! Those are my brussel sprouts. The brussel sprouts I spent months carefully tending, picking off all of those nasty caterpillars so we could enjoy some nice fresh ones for Thanksgiving dinner... Yeah, they are in the compost pile now with not a single sprout to show for it. So sad! I'll try again next year, and hope to get them in the ground sooner, and be more vigilant about the cabbage moths.

Anyway, now that the snow has melted and we have had a couple of unseasonably warm days, it's time to do what we should have already done - winterize the house! Here's our list:

- Put up the fans and window unit ACs and bring out the humidifiers
- Put the outdoor cover on the one permanent window AC
- Dump the contents of all outdoor potted plants in the compost bin
- Completely clean out the garden, till the soil, and bring in the stakes and tomato cages
- Most years we collect bags of leaves from the neighbors and till these directly into the soil, though we are skipping that this year
- Divide perennials that need it, and otherwise tidy up the flower/herb garden
- Spread the mulch in the front that has been sitting out for several months :P
- Bring in extraneous yard stuff - garden hose, buckets, outdoor toys, etc...
- Give the car a thorough washing and waxing
- Rake leaves and fill up the compost bin
- Turn the compost before it freezes
- Set out the bird feeders and fill with seed
- Bring in the grill and outdoor furniture

Did I miss something?

Compost Bins

If you haven't build a compost bin, this is a nice time of year to do it. Collect the bags of leaves your neighbors set by the curb for some wonderfully rich compost. Preacher Man built our side-by-side bins out of pallets. He bolted three together and used a fourth leaning against the front as a door. We have one for current use and one with the previous year's compost to let it age really well before being used in the garden. The system is working really well!

It's been lovely spending a long couple of days outdoors in the sunshine. I know these days are numbered, so I'm determined to soak up the sun while it lasts!

Pin It

Tuesday, September 27, 2011

The Very Hungry Caterpillar

This post is about cabbage moths. If seeing pictures of bugs will cause you to lose your breakfast, you might want to just skip this blog. It's not pretty. :/

caterpillar egg

Have you noticed those cute little white butterflies flitting around your brassica family plants? (These would be cabbages, broccoli, cauliflower, and my personal favorite, brussel sprouts.) Those are cabbage moths and they are not so cute when they start multiplying.

tiny caterpillars

The nasty caterpillars with their voracious appetites will devour your plants and with them, your hopes and dreams for having fresh roasted brussel sprouts with your Thanksgiving dinner!

cabbage moth damage

If you want to save your sprouts without resorting to pesticides, I recommend an intensive search and destroy mission several times a week.

big caterpillar

These are the tools that make it bearable for me. I can't wait for the day when I can delegate the task of caterpillar decimation to the Littles. Cannot wait!

garden snips

How to kill the cabbage moths:
  • If you don't like touching squishy things, glove one hand and have garden snips ready in the other.
  • Carefully inspect each leaf. Brush off the tiny little eggs hiding underneath the leaves. Brush off any thread sized caterpillars or cocoons you happen to find.
  • When you find those bigger caterpillars, they must be squashed. I use the garden snips to do the job. *shudders* It is not pleasant, but it must be done.
  • Repeat every couple of days. Vigilance is crucial!!
Do any of you, kind readers, have any tips for me on how to save my sprouts?

You DID catch the children's book reference, right?


Just had to be sure. :) I'm a big Eric Carle fan as are my Littles, though I can never read this one in quite the same way.

Friday, September 16, 2011

Canning Salsa

Salsa Ingredients

This is my tried and true salsa recipe. It is really delicious and a jar of salsa makes a great gift! I try to make at least two batches every year so we have plenty to eat and share. When you are ready to make this, make sure your kitchen is well-ventilated. The fumes from all of the peppers and onions are quite strong!

For basic information on home canning, see this post: Home Canning Basics

Ingredients:
- 10 lbs. tomato, chopped
- 6 med. onions, chopped
- 3 c. assorted bell peppers, chopped & seeded
- 12 jalapeno peppers, chopped & seeded**
- 5 chili peppers, chopped & seeded**
- 10 garlic cloves
- 1 1/3 c. white vinegar
- 1/3 c. chopped cilantro
- 1/4 c. salt
- 1 1/2 tsp. black pepper
- 1 1/2 tsp. cayenne pepper
- 1 tsp. cumin
- 1/4 c. white sugar**
- 1/4 c. brown sugar**
- 2 tbs. lime juice
- 3 cans tomato paste

Directions:
Combine all ingredients in a large stock pot. (Use latex gloves when preparing hot peppers.) Bring to a boil, then reduce heat. Simmer for about an hour stirring occasionally, and paying attention towards the end to be sure it isn't sticking to the bottom. Ladle into hot jars leaving 1/4" headspace. Cap and process for 15 minutes in a water bath canner. Remove jars, let cool, and enjoy!

Number Of Servings: between 12 - 15 pints

**Note - this recipe is great for northern/Siberian tomatoes like "Early Girls", which tend to be very acidic. In our current home with a more temperate climate with different tomato varieties, this recipe ends up being way too sweet to me. I currently adjust the recipe to add half again the amount of hot peppers, and I leave out all of the sugar. It all depends on your tomatoes and personal preferences, but this recipe is a good starting point.

Thursday, September 15, 2011

Don't Put All of Your Tomatoes in One Basket

cracked tomatoes
Lessons Learned in Gardening

I've used various gardening strategies over the years and consider my thumb to be at least a shade of green, but this year of gardening was a tough one. It was difficult for everyone, and even the professionals struggled. The weather was particularly uncooperative and there were many extremes going on. In the picture above, you will see what happened to my tomatoes when they received a deluge after weeks of a dry spell. They filled with water, and burst, every one!

But the problem was not just the weather. I made several key mistakes this year and I am writing about them now so I remember what NOT to do in the coming years. Maybe you can learn from my mistakes too.

#1 - PLANT A VARIETY
As I said in the title, "Don't put all of your tomatoes in one basket!" My grandpa told me years ago that it seemed like every year there was a vegetable or fruit that did particularly well and there was usually one that did poorly. He advised that I preserve extras of the ones that do well to cover the next year in case the harvest was poor. He was wise about this!

Early in the season, I decided to make the majority of my garden devoted to the more expensive vegetables that we like to buy like lettuce, tomatoes and peppers. This meant that I would have to forfeit space for other vegetables, so I planted very few green beans, no potatoes, and few carrots. I joked that I had planted a "nightshade garden" because I had so many tomatoes and peppers in it and I wondered how that would play out. Well, it was a poor idea and I should have planted more variety. Putting most of my stock into tomatoes, which were terrible this year, meant that I had very little from the garden at all this year. We've had enough peas and green beans to eat for dinner every few days, and some good peppers, but nowhere near the yield I should have gotten out of this space.

#2- TEND THE TOMATOES
As I said, tomatoes were a disaster, and probably would have been poor no matter what because of the weather. But part of the failure was mine. I planted them, plunked a cage over the top, and expected them to thrive as they have in the past. Not so this year. (Rather reminds me of children. You can't just plunk a cage over them and expect them to raise themselves. Oh no, they require loving tending. In fact, there is a book out there on the very subject with some very interesting thoughts.) So after a season of extreme weather, this is what my tomatoes looked like a week ago:

Photobucket

I wince when I look at that picture. The vines are long and spindly and doubled over their cages leaving the fruit vulnerably on the ground. The vines are weak, so much so, that I have been having to pick my tomatoes before they fully ripened lest they fall off the vine and become infested with pests. I should have tended them better, making sure the branches grew within their supports and tying up the largest stems as needed.

#3 - BIGGER TOMATO CAGES
Early in the season, I told Preacher Man we needed more tomato cages. He picked up the four tier ones that cost more than I wanted to pay. We debated exchanging them for the smaller ones, but decided to keep them since the savings would hardly be worth the gas of the special trip it would require. The tomatoes that grew in the larger cages are the only ones that remained healthy and are still standing today. These big plants need the large cage supports and the tomatoes that were in the 3 tier cages are the ones lying all over the ground. From now on, all of the tomatoes will go in the larger cages and we will use our old small ones for peppers and brussel sprouts.

#4 - NO MORE VOLUNTEER SQUASH
I let that butternut squash wind all through my garden and it utterly took over. The massive vines weakened my tomato plants and also made it impossible for me to get through to weed around them or tend the vines. As exciting as volunteers are to me, I told Preacher Man to remind me of my folly and to make me tear them out. It just isn't worth it.

I'm just trying to live and learn here. Every year of gardening is different and that is what keeps things interesting. As we wind up this year's harvest, I'm already excited about making plans for next year and I still have hope for my brussel sprouts!

What have you learned from this challenging year of gardening? Are you reaping a good harvest or have your plants succumbed to the poor weather?

Friday, September 2, 2011

Preserving the Harvest

Canning Tomatoes

Proverbs 6:6-8
Go to the ant, O sluggard; consider her ways, and be wise. Without having any chief, officer, or ruler, she prepares her bread in summer and gathers her food in harvest.
Over the years I've had many people ask me questions about canning. I did this write up several years ago to summarize the process for someone who is interested in getting started. I taught myself how to do this by reading books. If I can do it, you can do it!

I'm planning to post some canning recipes in the coming weeks, including, my salsa recipe, how to do crushed tomatoes, and apple pie filling. I typically do jam earlier in the year, but I'm happy to share those recipes too. Got any requests?

- - - - - - - - - - - - - - - - - - - - - - - - - -

First off, if you just want to dabble in making some jam or making some salsa, then my instructions should be sufficient. If you are serious about learning the whys and what-fors, then I strongly recommend purchasing the Ball Blue Book of Preserving. You can find it at Wal-mart for less than $10 and it should be at any library. It has detailed instructions, recipes, and step-by-step pictures for dummies like myself! In fact, almost all of the equipment I discuss can be found at Wal-mart, some grocery stores, and many hardware stores.

Secondly, ANYBODY can learn to do this! I taught myself just from reading books, and it is very simple and enjoyable. A gift of homemade jam, salsa, or even vegetables is always well received!

Third, canning is a very scientific process. If you are a cook like me that likes to dabble around and change half the recipe, you must restrain yourself when you are preparing foods for canning. Changing the amount of sugar, vinegar, lemon juice, etc... in a recipe must never be done! It is pretty safe to dabble with amounts of salt and spices, but leave any main ingredient alone! Also, if a recipe gives guidelines for peeling, chopping, pureeing, etc... you must follow these instructions. Any changes you make can affect the processing and can result in failure and unsafe food. So, basically: FOLLOW THE DIRECTIONS! :)

Fourth, make sure you have plenty of time to prepare your foods, and to process them. You don't want to be hurried through this, and sometimes things will take much longer than you expect. If you've never done a canning project before, devote an entire morning or afternoon to it. With Littles, I do canning after they are put down for bed and Preacher Man is there to jump in to take care of them if they wake up. After you prepare the recipe, the filling and processing of the jars MUST immediately follow.

Fifth, HAVE FUN and don't get too stressed out about it!

- - - - - - - - - - - - - - - - - - - - - - - - - -

HOME CANNING BASICS -


TWO METHODS: (all recipes should specify which method to use)
1) Steam Pressure Method: Requires the use of a pressure canner, which is an expensive piece of equipment. If you don't have one, check around, maybe some ladies at church would let you borrow theirs. Steam pressure canning is for low-acid foods, including almost all vegetables. The steam pressure is needed to raise temperatures high enough to kill all of the bacteria and toxins. I will not be posting any steam pressure recipes here. If you wish to try canning vegetables, I would carefully read your instruction book for your pressure canner, and check out the Ball Blue Book for more info.
2) Water Bath Method: Used for high-acid foods, including most fruits, tomatoes, and anything in a vinegar brine, such as pickles or sauerkraut. A water bath canner is actually pretty inexpensive. It's a large pot that comes with a rack that holds the jars. They are generally available in pint and quart sizes. Unless you have a large family, a pint processor is all you should need. Sometimes you can find these at garage sales.

Note for dummies like me: don't try to process quart size jars in a pint size canner. To make them fit you have to remove the rack and have the jar sitting in direct contact with the bottom of the pot, which causes jar explosion. Don't make my mistake!

You *can* use a large stock pot for canning if you are careful to have a folded up kitchen towel at the bottom of the pot that keeps the jars from coming into direct contact with the base of the pot. You will also want to make sure your pot is deep enough that you can cover the jars with with water.


EQUIPMENT: In addition to a canner, you'll need...
Stuff you probably have around your kitchen -
- a stockpot or two to prepare food for canning
- a pair of tongs (helpful in removing jars and lids from the canner)
- a wet rag
- several towels to set hot jars upon
- a plastic spatula
- a potato masher helps preparing jams and anything needing mashing
- a timer
- spoons for stirring, a ladle

Specialty, yet ESSENTIAL equipment -
- home canning jars free of chips and cracks - jars can be cleaned and reused - I find these at garage sales frequently!
- lids - you MUST use a new lid for every jar you process, so be sure to have plenty!
- bands - these can be reused, just don't use any that are bent or rusty
(wash all of the above in hot, soapy water just before using)

Specialty, non-essentials -
- jar lifter - designed to lift and carry canning jars - very handy!
- Jar funnel - unless you want to make a terrible mess ladling food into the jars, get one, they are designed to fit inside canning jars and have a large opening

- - - - - - - - - - - - - - - - - - - - - - - - - -

Here is what you do:

STEP 1 - PREPARING JARS: In addition to washing the jars, lids, & bands, jars must be heated for 10 minutes just before filling. (Always put hot food into hot jars!) Submerge the jars, lids & bands in your water bath canner or in a saucepot with a towel folded in the bottom (so the jars are not in contact with the bottom of the pot). Bring the water to a simmer, keeping them simmering until you are ready to use them. (Sometimes it is handy to have a separate smaller pot to heat the lids & bands. This makes it easier to fish them out when you need them. Don't boil the water, just simmer. Boiling can cause the seals to fail.)

STEP 2 - PREPARE THE FOOD according to the recipe. (If it is going to take you a really long time to prepare the food, you can wait until you are nearly done before turning on the heat for the jars, lids & bands.)

STEP 3 - FILLING JARS: Your food is hot, your jars are hot, you're equipment is all handy, and you're ready to go! Don't get into too big of a hurry at this point. Work on one jar at a time. Remove a jar, a lid, and a band from the water bath. Put the funnel on top of the jar and fill with the specified amount of food. Recipes should all specify the amount of headspace you need to leave between the top of the food and the lid. As a general rule, leave 1 inch for low-acid foods like vegetables and meats, 1/2 inch for high acid foods like fruits and tomatoes, and 1/4 inch for juices, jams, jellies, pickles, and relishes. Use the lines on the outside of the jar to help you measure. Take care not to fill the jar too full, and make sure that you've also got it full enough - remember it's an exact science! Next, you need to remove the air bubbles. Run a non-metallic spatula or a plastic knife inside the jar between the food and the side of the jar, pressing back against the food to release trapped air. Add more liquid if needed to have the proper headspace. Next, wipe around the rim of the jar with your damp cloth and make sure it is clean so you can get a good seal. Set the lid on top, and screw on the band just until it is firm and snug, but not too tight. Using the jar lifter if you have one, place the jar onto the canner rack in the canner. Repeat this process until you have prepared all of the jars.

STEP 4 - PROCESSING JARS: Lower the rack into the boiling water and make sure all of the jars are covered with a least 1 inch of water and put the lid on the canner. Bring the heat up to medium-high, and when the water comes to a full, rolling boil, start the timer for as long as the recipe specifies. After the time is up, turn off the heat, and remove the canner lid. Let the canner cool for 5 minutes and then remove jars. Set the jars upright on a towel or cutting board to cool, leaving space between the jars for air to circulate. Do not tighten the bands further. Let the jars cool naturally for 12 to 24 hours. You will hear a "ping" sound when each lid seals! This is a good sign! After 12 hours, if you tap on the top of the lid and it does not give, then it has a good seal.

If you have a jar that did not seal, you can 1) go through the process again and take better care this time 2) put it in the fridge and use the jar first


STEP 4 - STORING JARS: Your jars can be stored for up to one year in a cool, dark place, such as a cabinet or basement. The ideal temperature range is 50*-70*. Label the jars with the type of food canned as well as the date. Before storing the food, you can remove the bands for other use. Enjoy the bounty of the harvest for the rest of the year!

Thursday, September 1, 2011

Thankful for Summer Produce

Photobucket

We have had some goooooood eating lately! I get such a thrill when I pick something from the garden and get to cook and eat it within a matter of hours. I also love the freedom that it gives me in my cooking. I freely add fresh herbs (basil, cilantro, oregano, chives, thyme), chop in some kale, throw in some fresh diced tomatoes, and add fresh green beans to whatever I am making. Being able to cook and eat this way makes me feel as rich as a queen!

fresh tomato pasta 2

linguine with fresh tomatoes, basil and oregano

For the most part, we eat seasonally, meaning we eat produce when it is ripe and in season locally. This means we enjoy buying fruits and vegetables at their lowest price, highest content of nutrition, and at their best flavor. It also means I thoroughly enjoy each food in its time. I'm not buying strawberries right now, but that is ok because I enjoy them in May and June. Right now I'm enjoying the delicious local peaches that are in season and am looking forward to the apples that are just around the corner.

Every couple of days, we enjoy eating crisp, fresh green beans cooked Italian style. They are DE-LI-CIOUS! Here's how I fix them:

Photobucket

Italian Style Green Beans
Saute a red onion in olive oil over medium heat until it starts to turn golden brown. Add a clove or two of minced garlic. Then add some fresh, young green beans (trim the ends first) and stir fry them. Cook until crisp-tender. They should not be mushy and should be bright green. Add in a diced fresh tomato and season with some salt and pepper and some fresh chopped herbs. (I like basil.)

You can do zucchini the same exact way.

Have you ever noticed that the best way to start a dish is to saute some onions and garlic? Yum!

Yesterday I told Preacher Man I could eat this every day. I could, but I won't, because when green beans are no longer in season, I'll be in love with fresh roasted brussel sprouts again. :) God is good and I am thankful that He has given us foods to enjoy in season!

Moses' blessing for Joseph's children in Deuteronomy 33 -
Blessed by the LORD be his land, with the choicest gifts of heaven above, and of the deep that crouches beneath, with the choicest fruits of the sun and the rich yield of the months, with the finest produce of the ancient mountains and the abundance of the everlasting hills, with the best gifts of the earth and its fullness and the favor of him who dwells in the bush.

Friday, August 5, 2011

A Peek in the Parsonage

Some of our goings-on in photos -

I'll give you three guesses what this is:

vanilla

Sometimes it's fun to play with your food.

play with your food

(And it helps Littles enthusiastically eat their mixed vegetables and turn tears into laughter.)

A volunteer butternut squash.

butternut squash

Getting ready to eat the first BLT of the year! My mouth is watering already!

first tomato

Drying herbs

Sage

And all of the general cleaning, laundry, playing, reading, learning and growing that happens every day around here.

And how do you like the new banner and layout? If you subscribe on Google Reader, click over and tell me what you think!

Life is good! We are blessed!

Have a great weekend!

Wednesday, July 27, 2011

Surprises in the Garden

volunteer squash

I've been a little restless these past couple of weeks. I'm getting impatient. I'm still getting a bit of lettuce and kale thanks to my nicely shaded lettuce pots. I have a lovely host of fresh herbs, but I'm not getting any other large vegetables right now except for one or two little peppers a week. This just isn't cutting it.

I'm playing the waiting game, and I didn't realize that this is what would happen when I planted so many late summer vegetables. I also didn't realize that pole beans take longer to grow than bush beans. Maybe next year I'll plant some of both! Hopefully soon, the green beans will be ready to saute with a fresh tomato or two. I have to admit, I am green with envy when I see my southern friends feasting on tomatoes and watermelons! It's hardly fair!

The peas have been pulled out and brussel sprouts have been planted in their place for the fall. A few recent discoveries have kept me excited about our garden.

Do you like surprises? When it comes to the garden, I LOVE them! I love seeing the volunteers that come up each year. This year, I have a magnificent butternut squash vine growing out of my compost box! I also have several nice tomato plants both in the compost box and in other surprising places. I think volunteers are fun, especially the mystery squashes! Sometimes they have to be ripped out when they grow too near more important plants, but I like to make room for them when I can.

Here is another surprise in my flower and herb garden. Do you know what it is?

hidden treasure

Let's zoom in for a closer look:

thyme

It's thyme! I was pulling weeds around the cilantro when I caught a distinct whiff of thyme. I looked in my hand, and what do you know? I had a sprig! I looked closer around the ground and found a sweet little patch. I weeded around it and even sacrificed some cilantro to make more room. I actually planted thyme along with the other seeds, but I didn't think it ever came up. It was a happy surprise to find it nestled under the daisies.

Well, it's a sunny day that actually isn't scorching hot, so I'm going to go enjoy it! I hope your day is just as lovely.

This post is a part of the Busy Mom's Guide to Frugal Gardening linkup.

Tuesday, July 12, 2011

Weeds

Creepers
"creepers" going after a tomato plant

Weeding must be my least favorite job in the garden. It can be grueling. It's hot, it makes my back ache, and they just keep coming back. Like washing dishes and doing laundry, it seems like the job is never done. Still, it is extremely important.

Once upon a time, Church Mouse found out she was pregnant after planting the garden in the spring. Spending the first trimester of pregnancy (and all of the fatigue and nausea that goes along with it) in the heat of the summer meant that I did almost no weeding until August. What a mess I had on my hands! The weeds were as tall as the tomatoes, and it looked like the entire lawn had moved into our garden plot! I systematically cleaned things out, but I learned some lessons along the way.

First and foremost, I learned just how important it is to keep up with the weeds. Just doing a couple of rows a week would have made a huge difference. I also learned that there are many different kinds of weeds and each one likes to wreak havoc in its very own way.

  • My least favorite weeds are the "creepers". They are viney and trail along the ground, sending out runners with shallow roots. They entwine themselves around the plant. Disentangling them is very tricky and often causes damage to the plant. I can't tell you how many times I've pulled out a nice vegetable plant along with a weed, and that is always a sad moment.
  • A second type of weed are the ones with deep tap roots such as dandelions. If you pull them from their greens, they will snap right off and you may think you've gotten rid of the weed. The problem is that there is a deep tap root running down that will just sprout another weed top in a few days. It takes a lot of work to dig out the tap root, but it must be done if you want the weed gone for good.
  • Another nasty kind of weed are the pricklers. You may not realize what kind it is until you grasp it in your hand and OUCH! Pricklers make weeding a pain... literally!
  • Did you know there are weeds that imitate certain plant? Sometimes it is difficult to tell a weed and a plant apart. One year I lovingly tended what I thought was a tomato plant, giving it extra water and fertilizer. I felt both foolish and furious the day when I realized that it was a weed!

And finally, I learned a LOT about what kind of damage they can do. Weeds can kill a plant. They stifle and suck all of the nutrients away that should be going to the fruit. Weeds also shade and cover the base of the plants in a way that doesn't allow airflow. Plants are smothered and the cover from the weeds allows insects, larvae, pests, and mold to thrive, so you no longer just have to worry about weeds, but now you are dealing with a whole host of other nasty invaders. Yuck! Also, if the base of the plants aren't getting enough air and sun and remain too moist, they can rot out. And saddest to me is when the plants grow getting their support from the weeds themselves. When the plants and the weeds grow up side by side for too long and you finally decide to take the weeds away, the plant can be too weak to support itself. If weeds are not kept in check, the best case scenario is that your plants will not realize their full potential in bearing fruit. The worst case scenario is that the plant will die, being slowly choked out by the world. Oh did I say world? I meant weeds!

So now maybe you can guess what I plan to say tomorrow when I post "Wednesdays With the Word." ;)

The battle against weeds in your garden is a grueling one. Be vigilant! Be watchful! But more important,

1 Peter 5:8 - Be sober-minded; be watchful. Your adversary the devil prowls around like a roaring lion, seeking someone to devour.


This post is linked with the Busy Mom's Guide to Frugal Gardening.

Thursday, June 30, 2011

Quinoa Salad

Big Littles: Looking at his plate... "When there is grass on it, I just brush it off."

The grass was kale. :P

A couple of years ago, I discovered couscous and it became an instant favorite in our house! It was a delicious, light summer lunch that provided for endless variations, and became an excellent vehicle for getting our toddler to eat broccoli. I still love couscous - it is tasty, and you can't beat it for speed. The problem is that it is not the healthiest choice out there. It is really just tiny pasta. Tiny white pasta. And white pasta is ok, but there are definitely healthier choices out there.

Quinoa Salad on Spinach

And then QUINOA entered our lives and I've been singing its praises ever since! Quinoa is the queen of whole grains, and it is naturally packed with protein. A salad made of quinoa is going to stick with you for a long time! I find that quinoa and couscous can be used interchangeably, so quinoa is my new vehicle for getting the Littles to eat their veggies. With the delicious, buttery taste, they don't even know how good it is for them.

Couscous can be ready in 10 minutes flat! Quinoa... not so much! It takes a little more preparation and cook time. If you skip these couple of steps, your quinoa will still taste great, but it will be hard on your digestive system. (Yeah... we learned that one the hard way! I'll spare you the details.)

  • 1 c. quinoa
  • 3 c. water
  • pinch of salt

Approximately 7-12 hours before you want to eat your quinoa salad, put the grains into a fine mesh strainer and run under water for a couple of minutes to rinse thoroughly. Put the quinoa into a stainless steel pot with the water and let it sit out at room temperature for the day. After it has soaked, add the salt and bring to a boil. Cover with a lid and reduce the heat to simmer. Simmer for about 15-20 minutes or until it is tender. Drain before serving.

Now for the veggies -
  • a few Tbs. olive oil
  • 1 diced onion (red onion is delicious, vidalias are also a treat!)
  • 3 lg. cloves minced garlic
  • 1 med. diced zucchini or yellow squash*
  • 1 ear grilled corn - cut from the cob*
  • 1 lg. grilled chicken breast - sliced thin (optional)
  • chives or green onions (optional)
  • diced tomato or halved cherry tomatoes*
  • 2 Tbs. pine nuts (optional)
  • 1/2 tsp. cumin
  • 1 tsp. dried oregano
  • salt and pepper to taste
  • may serve over a bed of fresh baby spinach
(Feel free to swap out whatever veggies you have on hand, using whatever is in season. Other delicious variations for the * veggies = carrot, bell pepper, broccoli, spinach or kale cut in a chiffonade.)

Heat the olive oil in a saucepan over medium heat. Saute the onion until it turns golden brown. Add the garlic, and cook until the garlic softens. Add the zucchini and any other veggies you decide to try and stir fry until tender. Near the end, add your grilled corn, pine nuts, grilled chicken, chives, tomatoes and seasonings. Serve over a bed of fresh baby spinach if you like. Parmesan adds a nice touch.

Quinoa Salad

Beautiful, isn't it? And so colorful!

Suggestion: The grilled chicken/corn really is amazing in this, but don't haul out the grill just for one ear of corn and a chicken breast... do some batch grilling! Grill corn/chicken for dinner one night and save some for your quinoa salad for the next day.

This may be eaten warm, room temp. or cold. Perfect picnic food!

Now don't you feel virtuous just thinking of eating these delicious veggies and good for you grains?

*happy sigh*

This post is part of the Four Moms Picnic Linkup.

Tuesday, June 28, 2011

Gardening With Littles

The Littles love it when I work in the garden. They love being outdoors with me and all kids love to dig in the dirt. But as always happens when I have my two tiny helpers, things get complicated.

I'm all about teaching children how to work in a fun and enjoyable way. At their ages, they are naturally interested in what I am doing and they don't think of it as drudgery, they think it is FUN! I want to cultivate a good work ethic in them now, but teaching them how to work in the garden means doing a bit of damage control, learning to let go a little bit of my expectations of perfection, and cultivating patience and love in how I teach them. It's an opportunity for growth all around.

I do not claim to have the perfect system here, but I'll share a little bit of what is working for us and the Littles - one pre-schooler and one older baby.

  • Set clear boundaries
Garden Boundaries

For half of the year, the Littles have free reign to dig around in the dirt, but once we start planting tender seedlings, they are not allowed to go into the garden for a while. They don't know to look down and walk carefully around baby plants, so we just keep them out until the garden has matured and the paths are obvious. (If we've kept up with the weeding, that is!) We've found putting up this very simple reminder in the way of some re-bar and twine helps them remember the new boundary.

  • Give them hard jobs and praise them for their efforts
family motto

Our family motto: Do Hard Things. We borrowed this idea from the Harris brothers' book by the same title, which I highly recommend. "Hard Things" for a little one in the garden may be something like collecting all of the weeds you pull into a bucket and taking them to the compost, or carrying rocks to the rock pile. It may be taking the green beans or peas you have picked and putting them into a bowl at the end of the row. It may be digging up a stubborn weed. Look for jobs that will stretch their abilities just a little bit, praise them for their strength and skill, and you will have some happy workers that take pride in a job well done.

  • But not too hard!
june 21 peas

The goal is to keep them busy doing productive (rather than destructive) things when they want to get involved in what you are doing. They are not slaves, so allow little ones to get distracted with a stick or a worm if their attention wanes. If you give them a job that is just too much for them, they will become discouraged. It's a fine line and takes some experimentation.

For instance, Big Little really wanted to pick peas like I was doing. I showed him how to look for pods that were ripe (nice and fat, visible outlines of the individual peas showing) and let him try to pull one. That didn't go very well. He nearly yanked the plant out of the ground, which would have been sad, but ok (see my last point). So I tried holding the plant for him and showing him where to pull. Still didn't work. Those peas are tough! I quickly gave him a different job to hold his interest. When all else fails, let them munch. ;) (See the second to last point.)

  • Give them real tools, their own plot of land, and some seeds
Photobucket

Yesterday, I held out the small trowel and the large hoe and asked Big Littles to choose one to carry for me. He picked the large hoe of course! (Little Littles loved toddling with the trowel though.) Don't bother buying plastic junk, just let them play with the real thing. Teach them safety (don't leave the rake lying on the ground with the teeth point up) and how to respect tools (put them away when you are finished), but let them try doing real work with real tools with real seeds and dirt.

  • Teach them to respect the plants as a food source
Kale

This one has made a really big difference with the pre-school child... the baby? Not so much, but we'll get there! We have an ongoing dialogue... "Watch where you step! Those baby plants are going to be our food!" "Don't pull out the lettuce! That is our food to eat!" "Don't kick your ball into the tomatoes, they are our food!" And so forth. It really has helped to enforce those boundaries and to help them understand that the garden is more than a big sandbox in which to play.

  • "Do not muzzle the ox..."
Shelling Peas

When the child is helping you in the garden and wants to eat some pea pods or a green bean straight from the vine, why on earth do we say no? I found myself saying no one day because it was right before dinner and then I stopped myself in my tracks. Why am I telling my child that he cannot eat fresh veggies? How many night do I find myself urging this very little one to eat veggies? A lot! (Big Littles has gotten pickier in the past year. We mostly ignore it, but veggie consumption takes more urging these days.) So I have started allowing unlimited fresh veggie snacking in the afternoons. They can eat from the garden, they can eat what I'm chopping for dinner, they can taste to their little heart's delight, and especially while they are "helping". As I titled this section, "Do not muzzle the ox"... the Bible says a laborer deserves wages, so I allow little workers to snack while they are helping.

  • Just let go!
Mischief

Let go of your perfectionism. People are more important than things! You may lose some of your crop to an enthusiastic helper. It is sad when it happens, but it is ok. If possible, plant extra in anticipation. Have patience and remember that tending those budding little souls is of eternal significance, while your garden is not.

The story of the final picture: While showing Big Littles how to shell peas, Little Littles sneaked onto the dining room table and greedily started eating the blueberries brought that afternoon by a friend. Of course, I had to get a picture before administering the necessary consequences. ;)

This post is a part of the Busy Mom's Guide to Frugal Gardening linkup.

Tuesday, May 24, 2011

Take a walk outside with me...

Lots of progress in the garden these past few weeks...

1) The peas are up between 6 and 8 inches high and are climbing the supports. We just used metal re-bar and sisal rope. Preacher Man wants to keep his eyes out for an old volleyball net to use for this purpose. When planting, I did two rows about 6" apart that can climb on the same supports. Nice way to maximize our garden space, and if they get too heavy, they can also lean on the fence.

May 21

2) The lettuce buckets are loving all of the rain we've had. I've thinned them out since I posted this picture, but they are still quite thick. I've got baby spinach leaves we can eat now! First produce of the year! Hooray!

May 21

3) In the herb garden, I had to give the parsley a heavy pruning. It had stalks like celery! It's seriously taking over! I'm getting some cilantro nearly ready to pick and eat. The annual seeds are taking their dear sweet time.

May 21

4) My favorite, favorite thing growing right now is my Mother's Day clematis. It's BEAUTIFUL! Bursting with gorgeous purple blooms. In a couple of years it will be gorgeous climbing all over the fence.

May 21

5) The front of the house got a facelift... trimmed shrubs, fresh mulch, and we removed a very sickly looking rhododendron that stuck out like a sore thumb. I'm rather proud of the front of our little house now. The littles have enjoyed watching birds come and go in the feeder.

mulched

6) And I think our front steps are rather inviting now that they are lined with flowers. Makes me smile. :) I hope it gives the mail carrier a smile too.

Photobucket

The vinca vine, begonia, and impatiens are a winning combination.

Begonia Vinca Impatiens

7) No picture yet, but this week or next, we are finally planting warm weather plants. Tomato and pepper seedlings are going out into the ground, and the green bean seeds, basil, and oregano are going in too.

Next week... compost! What would you like to know about it?

Linked up with Frugal Gardening 101: The Busy Mom's Guide.

Wednesday, May 4, 2011

Maximizing Garden Space Without Losing Your Yard

Photobucket

We have a small yard in the middle of town. We dedicated one plot to the vegetable garden and one section to the clothesline, but if we till up much more soil, there won't be any room for the Littles to play! We have to be creative in how we use our space. One of the ways we do that is by using containers. This year I am trying to grow greens in containers. Lettuce, spinach, kale, etc... have very shallow roots and do not need very deep soil. I like using the containers because I can move them around depending upon the weather. All of these are cool weather crops, and since the weather is still not very warm here, I keep them in a nice sunny spot on the western side of the house so they can get well-established. As we get into the hot, hot days of summer, I will move them to a shadier, cooler spot in hopes that they will extend their season a bit. I only planted half of the seeds I bought, so as they wither, which will probably happen in July, I will plant new seeds for a batch of fall lettuce. We are also considering building a cold frame against the western side of the house so we can get greens and lettuces into the winter. I'll have to let everyone know how that goes this fall.

If you need a source for cheap containers, try going to a nursery and asking if you can buy some old tree buckets. Actually, first ask if they will give you some, can't hurt, right? I think we paid $1 each for these.

Photobucket
Just up: our baby peas!

Another way we maximize our food growing space is by going vertical and using the fence line. This isn't prime play space, so it works well for growing some extra food. We dug up about 2 feet of soil along the fence where I like to plant crops that need extra support. Last year this is where we grew some tomatoes, this year, we planted peas, and I think next year we'll plant the pole beans there. Speaking of which, if you are a beginning gardener, you may not realize that it is important to rotate your crops. A three year rotation is really best, but if your space is limited, at least do a two year rotation. Rotating crops helps control insects and disease. Keep in mind that this applies to families of plants. Tomatoes, eggplants, potatoes and peppers are all in the same family and should not follow one another. Cabbage, broccoli, cauliflower, cabbage, kale, and other greens are all in a different family. It adds an extra challenging element to planning your garden, but if you think of it like a jigsaw puzzle, it can be fun!

Going vertical is great for creating more space in your garden, but watch how the plants shade one another. You don't want your taller plants to block all of the sun for the shorter ones. Just another piece of the puzzle!

Photobucket
Herb and flower garden two weeks ago.

Photobucket
Herb and flower garden now.

Look how much this little plot has grown in two weeks! Astonishing! The parsley is really taking over! I've been using it a lot in my cooking, but I am also happy because it attracts the butterfly caterpillars. I love that I have the garden space to dabble in growing some flowers now.

Linked at Frugal Gardening 101.

Wednesday, April 20, 2011

Bible Verses on Herbs

Genesis 1:29 - And God said, “See, I have given you every herb that yields seed which is on the face of all the earth, and every tree whose fruit yields seed; to you it shall be for food."

Deuteronomy 2:1-3 - "Give ear, O heavens, and I will speak, and let the earth hear the words of my mouth. May my teaching drop as the rain, my speech distill as the dew, like gentle rain upon the tender grass, and like showers upon the herb. For I will proclaim the name of the LORD; ascribe greatness to our God!

Proverbs 15:17 - Better is a dinner of herbs where love is than a fattened ox and hatred with it.

Luke 11:42 - "But woe to you Pharisees! For you tithe mint and rue and every herb, and neglect justice and the love of God. These you ought to have done, without neglecting the others."

(This one is wildly out of context, but I like it on its own nonetheless...)
Hebrews 6:7 - For the earth which drinks in the rain that often comes upon it, and bears herbs useful for those by whom it is cultivated, receives blessing from God;

My Herb Garden

I find such peace working in the soil, cultivating beautiful, living things. Last weekend, Preacher Man and I did some work cleaning out my little herb and flower garden and I planted my annual seeds for the year. I get so excited watching this little plot transform!

Photobucket

Growing your own herbs is very inexpensive and is so rewarding. Once while we lived in an apartment, we grew herbs in a sunny kitchen window in little terracotta pots. They did surprisingly well! I'm happy to have some room in the soil to plant them now, as they really thrive that way.

My parsley remained alive over winter despite being covered snow for so many months. It has even doubled in size! I planted some sage and thyme as seen in the picture above, and I plan to grow chives and mint in a partially buried pot. (This is because these herbs tend to take over unless you take some measures to contain them.)

When the weather warms up, I will plant basil, oregano, and cilantro in the space in between my tomato plants in the larger vegetable garden. Basil in particular improves the taste of tomatoes. Did you know that it is advantageous to plant certain things near one another? This is called "Companion Gardening". Certain herbs and vegetables help one another by repelling pests or improving taste and growth. The reverse is also true, some herbs and vegetables should not be planted near one another. Here is a set of recommendations for companion gardening that I have collected from various sources:

*Borage deters tomato worms. It's also good for strawberries and squash.

*Catnip deters flea beetles.

*Chamomile improves cabbage and onions.

*Thyme deters cabbage worms.

*Sage helps rosemary, cabbage, and carrots. It deters cabbage moths, beetles, and carrot flies. Do not plant it near cucumbers.

*Summer Savory improves the growth and flavor of beans and onions. It discourages cabbage moths.

*Roses like garlic and parsley. (Garlic repels aphids.)

*Tomatoes like basil and parsley.

*Cabbage likes dill and sage, but NOT tomatoes.

*Carrots like lettuce and chives, but NOT dill.

*Radishes like nasturtiums.

*Asparagus likes tomatoes.

*Horseradish keeps away potato bugs.

*Marjoram improves the flavor of all vegetables.

*Mint improves the health of cabbage and tomatoes.

*Rosemary deters cabbage moths, bean beetles, and carrot flies. It's also good for sage.

*Do not plant basil near rue.

*Bee balm is good for tomatoes.

Photobucket

My tiny daffodils make me smile!

Happy Gardening!

Isaiah 40:8 - The grass withers, the flower fades, but the word of our God will stand forever.

This post is a part of the Frugal Gardening 101: Busy Mom's Guide linkup. Click on the link for more gardening posts.
Related Posts Plugin for WordPress, Blogger...