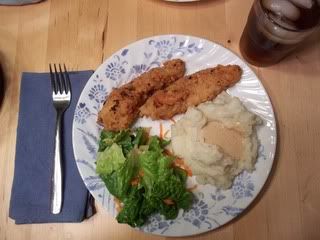
Making one of Preacher Man's all-time favorites... Fried Chicken! Seems like nearly every potluck has someone bringing a bucket of chicken. There is no way I have the time during this season of my life, but someday when I'm a little more free with my time or have more slaves... errrr... children to help out around here, I would love to be the person that brings fried chicken to every potluck. Only my bucket will be HOMEMADE! :) The chicken that is... not the bucket. Well, maybe the bucket too... I digress.
I watched my grandmother make fried chicken, fried okra, mashed potatoes and homemade gravy countless times. It is truly an art. I'll do my very best to tell you how I do it, but this is one of those things where I don't measure ingredients and I just do without thinking, because I've done it since I was a child. I can certainly give tips and suggestions, but frying and gravy making just takes some practice. And indeed, it is one of those things that you may not really want to practice too much for the sake of your health, and that is understandable. Our family is extremely active, we don't eat out, and we don't eat much junk, so we can afford the calories every once in a while as a treat. And to be honest, I only deep fry a couple of times a year just because of the work it takes and the mess it makes in the kitchen. :)
So put on your apron and let's get started!
You'll need some chicken. A whole chicken cut up, or whatever assortment of pieces you and your family like amounting to 3-4 pounds. I like to cut boneless skinless chicken breasts into strips or little nugget chunks, but you pick out what you like.
Buttermilk Marinade:
2 c. buttermilk*
2 tsp. salt
1 tsp. cayenne
1 tsp. onion powder
1 tsp. ground pepper
1 tsp. garlic powder
1 tsp. dried thyme
(This seasoning combo is from the Clinton St. Baking Company Cookbook and is my very favorite.)
Flour Coating:
3 c. flour
2 Tbs. salt
2 tsp. pepper
Oil for frying. I usually use canola.
*for the dairy sensitive, we substitute goat milk for all milk in this recipe
1) Whisk together the marinade ingredients in a large bowl. Add the chicken pieces. Cover with a lid and store in the fridge for 3-4 hours.
If you are going to take the time and trouble to make fried chicken, you really must do the marinade. It is totally worth it!
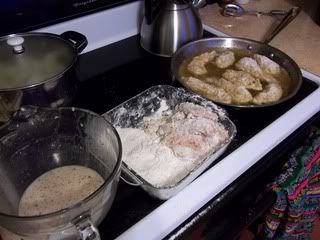
2) Mix the flour coating and set up your "frying station". Here's mine:

From left to right you will see the marinade, the flour coating, and the frying pan. The left hand is used to work with the marinade and the flour (the club hand, I call it, you'll see why if you do this!) and it will get really, really nasty. The right hand is used to work with the utensils.
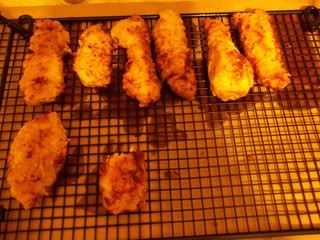
You cannot see it, but to the left of the "frying station" is the "draining station". I use a big brown paper bag with a cooling rack on top. This will allow the grease to drain, but the chicken itself won't sit in the grease. Looks like this:

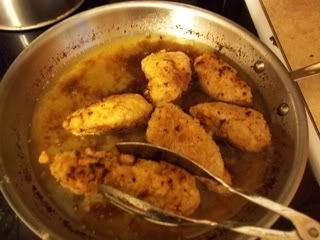
3) Now you'll want to heat the oil over medium heat. I add oil to the pan until it is about 1" deep. I use my All-Clad fry pan or my cast iron skillet. The larger the pan, the better. It will take a while for the oil to heat up all the way. You can start preparing some chicken while it heats up.
BATTER UP!
4) Coating the chicken: I recommend the method of double coating. You will get a much better crispy crust this way, and isn't that what fried chicken is all about? With your left hand, remove each piece of chicken from the marinade. Roll it in the flour mixture, coating lightly. Dip briefly back into the marinade, and then coat thoroughly in the flour mixture. Let the chicken rest on a separate plate until it is ready to go into the oil.
5) Check the oil to see if it is hot enough. I run my hand in the sink and flick a little water into the pan. If you hear a deep, hollow popping sound, it is ready. If you don't hear that sound, keep waiting until you do. Using some tongs, add the chicken pieces one at a time. Don't crowd them too much, you want to be able to turn them.

6) Turn the pieces as they are done on each side, but try not to handle them too much so the delicate coating stays intact. Remove from the oil when the meat is done and set the pieces out in a single layer to drain. The coating will be golden brown and crispy, but you cannot strictly rely upon the outside appearance. This is where I go by intuition and experience... If you are a novice, use a meat thermometer or cut open a piece to be sure it is done.
7) Munch on a piece or two while you fry the rest. But don't eat too much, because you want to enjoy eating it with that yummy gravy!
Now, on the gravy... I've made a lot of gravy and I still get very stressed out when I do it. I love cooking with my littles, but I shoo everyone out of the kitchen when it is time to whisk the gravy! I'm not going to tell you how to make it step by step because it's something I mostly do by intuition. I can't take pictures while I'm doing it because I'm usually too busy tossing in more milk or flour and whisking like a mad woman. So I'll give you some links to a couple of ladies who CAN show you how to make gravy and I will give you my tips.
Making gravy is both an art and a science. In a nutshell, all gravy making is:
1) warming up fat (butter, meat drippings or oil usually) - as much as you can, use those tasty meat drippings to get the best flavor! For this fried chicken recipe, I drain out all but about 1/4 c. of the oil to make the gravy, taking care to leave as much of the good crispy bits in the oil.
2) whisking in an equal amount of flour
3) lightly cooking that fat/flour mixture, whisking all the while
4) thinning it out with milk, still whisking away
5) re-warming the gravy and allowing it to thicken some more, but not too much because it will thicken even more at the table as it cools. Are you still whisking? Don't stop!
6) seasoning the gravy with salt/pepper, more whisking...
7) transfer to the table, you're done!
It's all about the fat to flour ratio - you want the same amount of each. Too much fat = oily gravy. Yuck. Too much flour = lumpy gravy. Yuck. Use equal parts. If you are a novice, do measure. If you are brave, just wing it like I do. ;)
And now, a lesson from the pros:
Mrs. Connie of Smockity Frocks - see the link on her main page where she is making gravy while getting her 8 kids ready for church. WHAT A WOMAN!
Pioneer Woman - This is her biscuits and gravy recipe, but it's all about the technique.
Don't forget to sip some southern sweet tea with your meal.
This post is a part of the Four Moms Go-on-a-Picnic linky.

Enjoyed the read, but I can't see me doing this anytime soon! Thanks for sharing!
ReplyDelete