
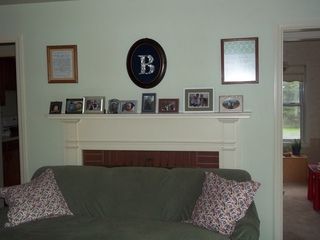
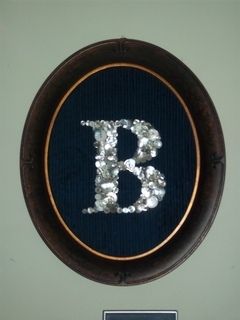
Did you notice the "B" on our mantel during the House Tour? Here it is again:
I'm just really tickled over my B. It was inspired by a pin on pinterest with a monogrammed E. The link was a dud, so I had to just wing it. I have since found a wonderful tutorial for a similar project here, you would just want to substitute the letter of your choice. I considered taking pictures and doing a tutorial myself, but I was doing this project at night while the Littles slept and the lighting was terrible. Plus, the first one I made really looked awful, so I was just figuring it out as I went along. I'll try to give you some tips so if you want to make one it will be a much smoother process.
- I chose the font I liked best for the letter B and enlarged it to 700 pt. I printed it, cut it out, and traced it on the fabric with a white fabric pencil. Worked just fine.
- Instead of gluing the fabric to the glass, I used the glass as a pattern to cut out the oval shape from heavy cardboard, and I hot glued the fabric to the cardboard... just around the edges. The glass really wouldn't work with the layers of buttons, so now there is an extra piece of oval shaped glass on my husband's workbench. I wonder if it will ever find a use?
- I dug around in my scrap fabric stash and found a lovely light blue cotton with a feathery print to use and soon discovered that the white buttons just didn't show up on the pretty print at all. So I dug around some more and found this heavy whaled corduroy in deep navy. It almost looks like velvet. It is PERFECT! So, bottom line, use dark fabric with white or light buttons, and light fabric with dark buttons for the best results.
- On the original pin, the buttons were all lying flat and even, but I found that I much preferred the look of layering the buttons to create an interesting texture and a look that was more filled in.
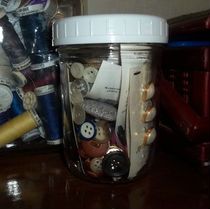
- My buttons were all collected over the years. Many of them were ripped off of my husband's old dress shirts. I also had a number of mother-of-pearl buttons that I bought in a package for a dress that I made. These have a gorgeous iridescent sheen, and greatly add to the look. You definitely want buttons of all shapes and sizes, and having a number of tiny buttons is very useful to enhance the level of detail.
- My frame was half price at Hobby Lobby, and was the only purchase I made for this project. It cost me $12. I had my heart set on an oval frame for this spot in the living room, and after scouring thrift stores and garage sales for a while, I decided to just go buy what I really wanted, and this was it. I could have made this project for $1 if I'd broken down and used a yard sale frame. Well, such is life. I don't think I'd be as enraptured with my B if I had used a rectangular frame.
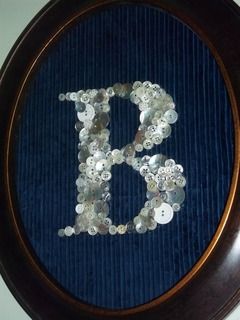 |
| Up close... |
Pin It
LOVE it! I have my great aunt's button collection that I've added to through the years. I'm definitely going to have to steal this idea!
ReplyDeleteLove!!!
ReplyDelete